Just How Important Is The Correct Lighting In Your Photographs?
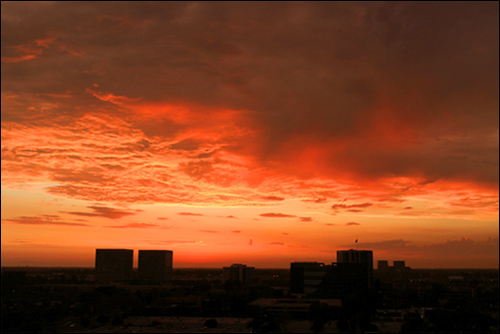 |
This shot utilizes a lot of the main areas that we're going to talk about. It's just a beautiful view of Orange County, California overlooking John Wayne Airport from a high-rise project that I was photographing.
Our first area that I would like to talk about is light and how important light is. A lot of times we don't really notice the light itself; we notice the things that it's illuminating.
While the sun is 93 million miles away – it is still coming from a source. If there are no clouds or anything in the way, we see the direction that the light is coming from... whether it's low in the sky, high in the sky, or late in the afternoon there's a certain direction.
So we are going to talk about the three main directions that light comes from as it illuminates the subjects.
Front Lighting
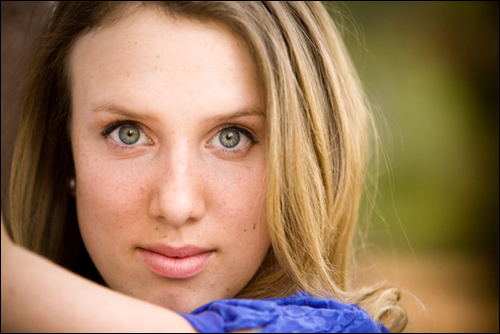 |
Front lighting occurs when the camera/photographer is in between the subject and the light source. Now, you don't want to be so close that you cast a shadow, that would cause an "eclipse" and that would be bad.
In the photo above, we have a front lighting situation...the light is falling on our subject almost completely straight on. There are very little shadows anywhere, but there is a slight shadow if you look at the upper right hand area of her forehead. (camera right)
When I talk about photos in this article, we're going to identify areas by camera right and camera left; not the subject's right or left because that gets all mixed up and I want to make it as clear as possible.
Let's move on to our next example which is side lighting.
Side Lighting
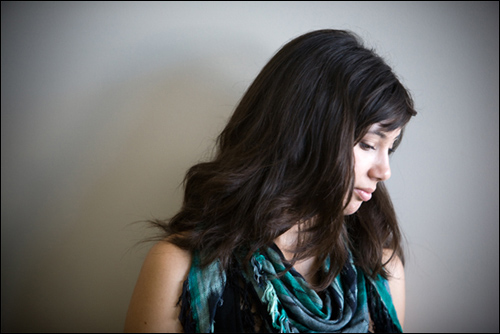 |
Side lighting is just that; it's light that's coming from the subject's side. In this example we are in a large building, in a foyer area, there's a bank of windows to camera right, and it's coming sideways from right to left.
We can see the model's face is illuminated and that there's a slight shadow behind her from that light source.
There are many variations to side lighting... it could come from the left or the right, or from different heights but basically when it all comes down to it, it is all side lighting. It's coming from the side.
This is a very good lighting technique, depending on the quality of it which is something that we'll move onto in a minute, but it is a good light source, a good direction to photograph people from.
One thing to watch for is that this type of lighting tends to emphasize wrinkles. If your subject wouldn’t like that, try a different direction that will make more sense.
For example, front lighting will not emphasize wrinkles as much as side lighting will. That brings us to our next area of lighting and that is back lighting.
Back Lighting
 |
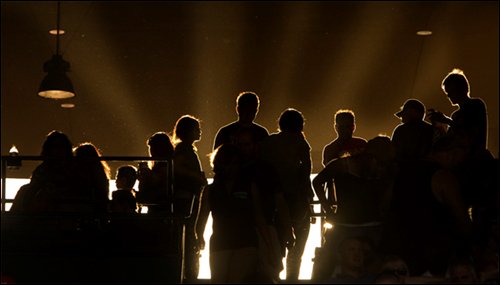
Now, back lighting is where the brightest source of the light is coming from behind the subject. The light falling on the subjects is less intense and you end up with a silhouette.
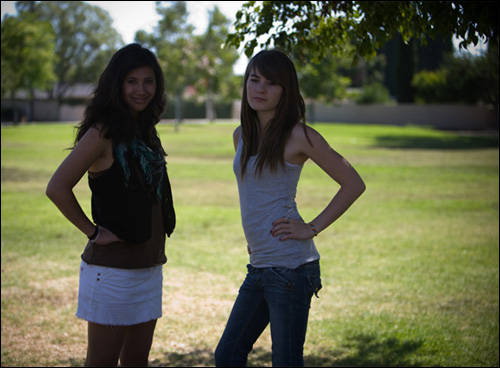
This picture here is a perfect example of what happens to a lot of amateur photographers. The subjects are standing underneath the shade of a tree and a lot of times we think, “stand in the shade of the tree, that's a great place for the photo.”
The problem is that our eyes compensate and we don't really notice how bright it is behind the subjects. The camera on the other hand, doesn't have that compensation feature built in; we have to tell it what to do.
So it sees the bright background, exposes for that, which in essence under exposes our subjects.
 |
Here's another situation where the light is coming from behind the subjects that are walking through a tunnel at Angel Stadium – and the light source, the sun, is setting behind them creating this glowing effect.
So while silhouettes are normally bad, they can be effectively used at times. Those are the three main directions of light that we're going to look at – front, side, and back lighting, and it is something that we need to be thinking about and recognizing before, during and after our photo sessions.
You don't want to just pick your camera up and start shooting as a photographer. If you want to progress as a photographer you need to start noticing these things, looking for them.
What I tell my students is to start looking at the light. Start studying light wherever you are... what direction is the light coming from? Then you will truly start seeing the light and using it to create dynamic images.
How Important Is The Quality Of Light?
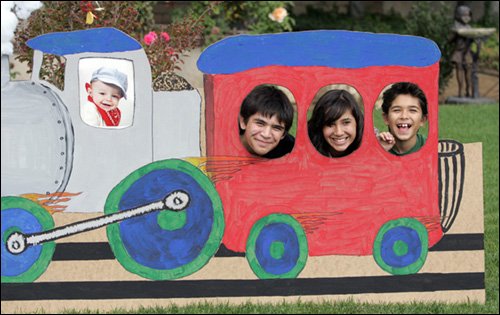
There's also something called the quality of light, and there are four different qualities that we're going to talk about. The first is bright light.Whether you're outside in the middle of the day and it is bright or you're inside where there's a lot of illumination, that is where bright light can occur. On this day there wasn't a lot of shadows, but it was bright.
So we've got the kids in this little cut out here and it's a great example of bright light.
Bright Light
 |
Dim Light
Of course, the opposite occurs whenever there isn't a whole lot of light present. This situation is called dim light and the next photo is a perfect example.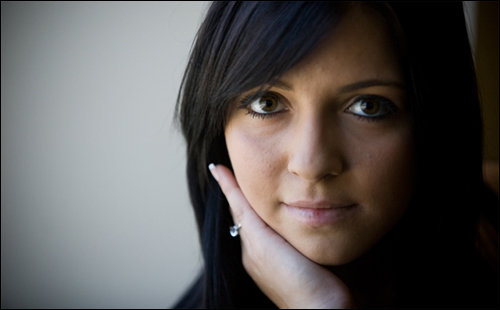 |
Because there's less light, the camera has to somehow get more light in, and it's usually done by either adjusting your shutter speed or changing your F-Stop.
Point and shoot cameras will do this for you automatically, and DSLRs will do it for you if you are in Program or Auto mode. Just know that fewer parts of your photo will be in focus because of there being less light.
For example, in this photo the subject’s eyes are in focus as is part of her hair. Notice that the tip of her nose isn’t, but looking back at the bright light image almost everything near the train is in focus.
That is one of the major differences in bright vs. dim lighting. Here's an example of harsh light.
 |
Harsh light can occur when the sun shining in somebody's face, or when a direct flash is used. It produces very defined shadows. You have to be careful when shooting in harsh lighting situations.
Your subject might be squinty or even unable to open their eyes. Specifically, people with lighter colored eyes have extreme sensitivity to harsh lighting conditions. Sometimes, utilizing side or even backlighting can help the situation. And the last light quality we'll discuss is soft light.
Soft Light
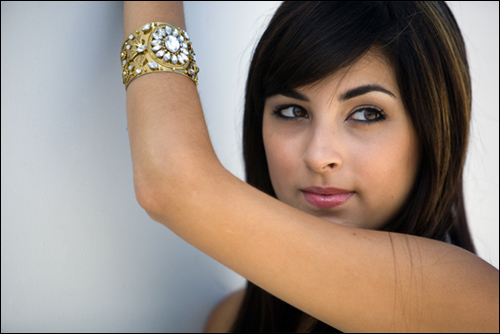 |
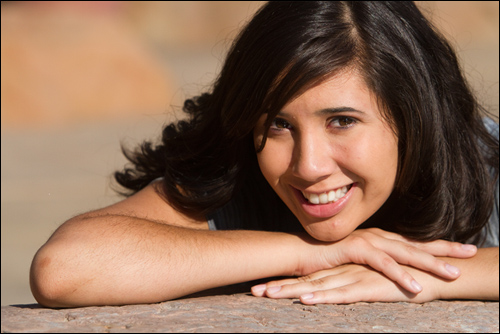
Soft light produces very even and almost un-detectable shadows. We can see the shadow cast on the white wall up by her arm, but you'll notice that the shadow is very soft and the lighting is very even.
These are our examples of bright and dim, harsh and soft. These are the main different qualities of light that you need to be aware of.
Obviously there are other factors to think about, but as you recognize these lighting situations it's only going to make your photography better. Practice!
Give yourself the assignment of identifying different kinds of light. Then put your subject in them and take note of the results. I've got a question for you. Have you ever taken a great photo? Everyone wants to look at it and tell you how good you are, and how you should do this for a living, and then you go out to do it again and you can't reproduce it?
Well, part of that is being unable to recognize the various types of light, the direction and the quality, that were present when you took that photo. As you teach yourself to recognize these different lighting situations, you'll be able to accomplish that much easier.
You will be on your way to becoming a better photographer. Next, we're going to discuss a lighting situation I call "open shade."
Open shade is a photographer's best friend and your photo quality will drastically improve when you learn to use it. If you're like most photographers, the majority of the photos you'll take will be of people and open shade is perfect for this.
Open Shade
 |
We love to take pictures of our loved ones, of pretty girls, of good-looking guys, so what's the best light for an amateur to photograph in?
Not all of us have access to studio lighting and even if we did, we probably wouldn’t know how to use it. Well, what is a good (and free) light source? One of the best lighting situations out there is called open shade.
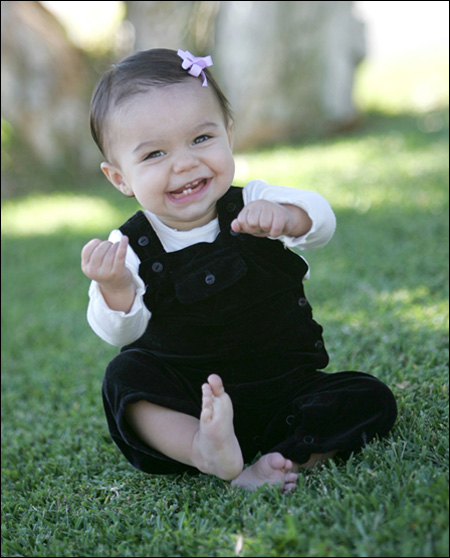
Where does open shade happen? You guessed it... in an area shaded from the full strength of the sun. In the shade. So we need to look for it.
In the picture above, I'm using the shade of a tree, but notice unlike that earlier picture of the two girls (under a tree) that was silhouetted, we have enough light falling on the subject so that the subject is for the most part brighter than the background.
We've got that tree trunk in the background, and we do have some little hotspots, but for the most part the camera saw the face of our subject and exposed for that.
And you'll notice this open shade lighting is very flattering. Very soft shadows, wrinkles don't show up – although this baby doesn't have to worry about this – but as people get older they do not want their wrinkles to show unless you're from National Geographic and you're shooting the 115 year old Chinese lady with 1,000 wrinkles.
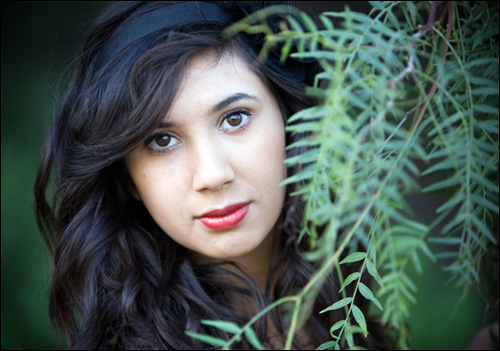 |
Here's another example of open shade lighting... it’s so complementary to the people we're photographing and especially to their faces.
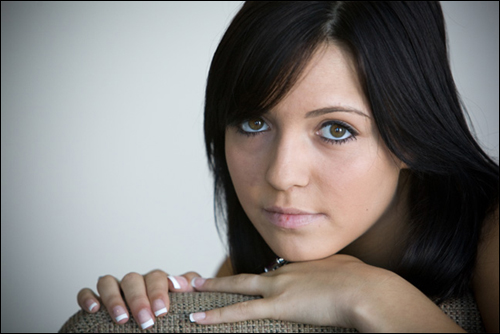 |
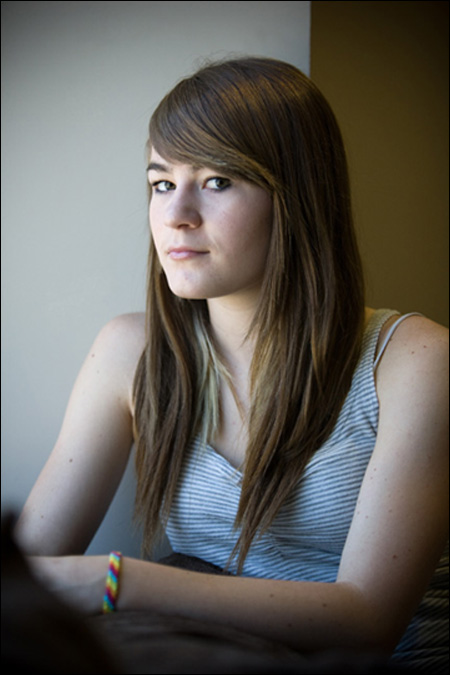
Open shade even occurs indoors. This photo was taken in the foyer of a large building by a window and the window creates this very soft light.
Remember this – even though you are in the shade, there's still light there and it has a direction to it and a quality to it just like we learned before. Look and see!
The direction of this light would be from camera right, as it comes across from that bank of windows, and it's – let me just ask you? Is it soft or harsh?
Soft is the correct answer.
The quality of the light is in the dim realm. But it's very nice, very beautiful light. Our subject has a slight shadow on camera left side of her face, but we can see into that shadow.
One other little tip here... Look into the eyes of your subject. And you see how the iris reflects/mirrors anything that's bright? These are called specular highlights. The iris is reflecting the light source.
It is a great way to figure out what type of lighting was used. A great way to practice this tip is to go to the makeup counter at the department store where they have those giant pictures of their models wearing the makeup and looking all cool.
Look in their eyes and you can see the studio type lighting that they used reflected in their eyes. Here's another example of open shade.
 |
We have our light source coming from camera left washing across our model from left to right. She has a slight shadow on the camera right side of her face. Very soft, very complimentary to our model, and regardless of their age this would be great light to put anyone in.
Next time you're looking to photograph someone, see if you can put them in that light. Of course my models were all under the age of 20, which is helpful when you're trying not to show lines in people's faces, but the principles work for everyone.
Open shade tends to be soft because there's not the harshness that you get with direct light. And again, it's very complimentary in most situations.
| Didn't find what you're looking for? Search here... |

Custom Search
|
Return from Identifying Light to Digital Photography Tricks

[?] Subscribe To This Site


Sponsored Ads
Recommended Reading
 |

Sponsored Links
David Coote
Wedding Photographer
Northern Ireland